Running Dashboards and Reports
You can run a report (CSV, banded, extract, or crosstab) or dashboard using any of the following methods:
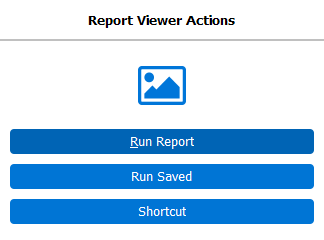
- Click the Run Report/Run Dashboard button under Report Viewer actions.
- Right click on the report and select Run Report/Run Dashboard.
- Double click on the report or dashboard.
- Run the dashboard associated with the DataBlock, and then choose the report from the dashboard menu.
- You can view a report that was previously executed and saved by clicking Run Saved.
Running a report opens the default dashboard for that report, which is the screen that allows you to input any parameters needed to generate the report. The dashboard may also display information and results, depending on how it is configured.
Note: Long-running reports can be canceled while processing using the Cancel button on the Report Processing screen.
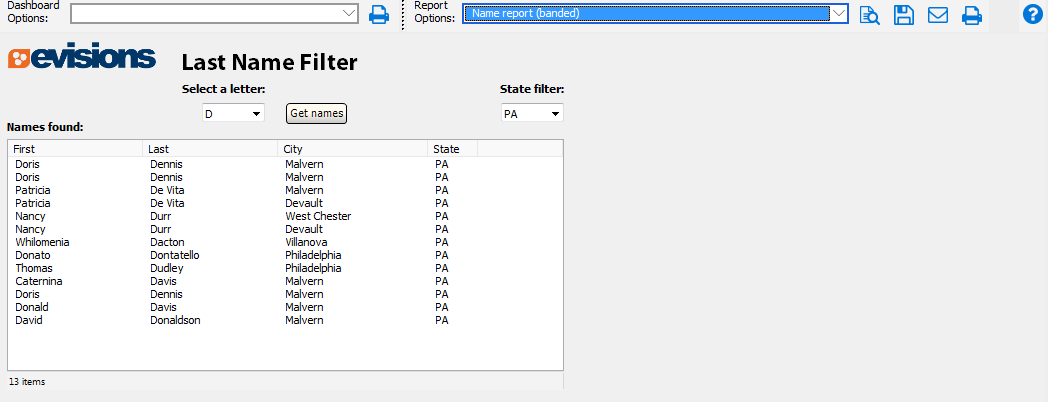
The toolbar at the top of the dashboard allows you to:
- Save, load, and manage dashboard settings for parameter entry.
- Print the dashboard form.
- Select a report to run. You may choose any report associated with this DataBlock.
- Preview the report (banded and crosstab reports).
- Save the report to disk (banded, crosstab, CSV, and extract reports).
- Email the report (banded, crosstab, CSV, and extract reports).
- Print the report (banded and crosstab reports).
| Icon | Description |
|---|---|

|
Report preview (Banded, Crosstab) |

|
Save report (Banded, Crosstab, CSV, Extract) |

|
Create and email report (Banded, Crosstab, CSV, Extract) |

|
Save the report and open it with an associated application ( CSV, Extract) |

|
Print the report (Banded, Crosstab) - select the printer icon in the Report Options area |
|
|
Print the image of the form (All report types) - select the printer icon in the Dashboard Options area |
Selecting the Report to Execute
If this DataBlock has any child reports, they are listed in the Report Options drop down. Select the report you wish to execute, and then click the Preview, Save, Email, or Print button.

If you are using a low screen resolution you may not be able to see all the Report Options or icons on the right. If this happens, you can click and drag the divider between the Dashboard Options and the Report Options to move the Report Options to where you can see them. On very small displays, an arrow button appears to allow you to scroll the toolbar.
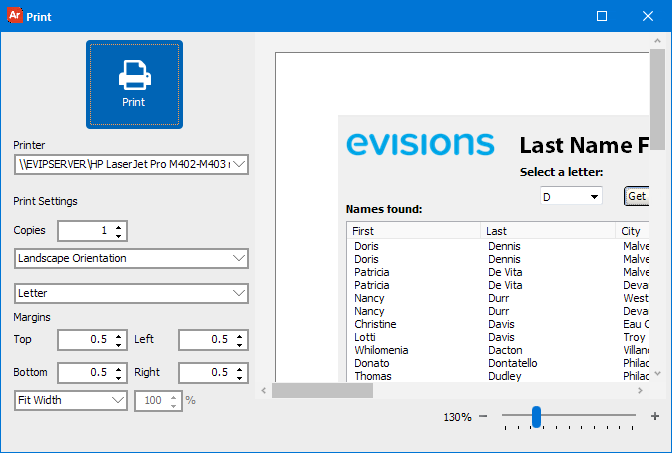
Print Options
When Print Form (the print icon in the Dashboard Options area) is selected, the Print dialog below is displayed.
The slider on the lower right zooms the image on the screen. This slider is ignored in the printed output. The Fit Width drop down provides choices to either fit the image or scale it on the printed output.
PDF and Excel Options
When saving a report as a PDF or Excel file (.xls), there are various settings you can configure for the output file. Refer to the
Saved Dashboard Settings
The Dashboard Options dropdown on the left of the toolbar allows you to save the parameters and settings used to run the report, and to load previously-saved settings.
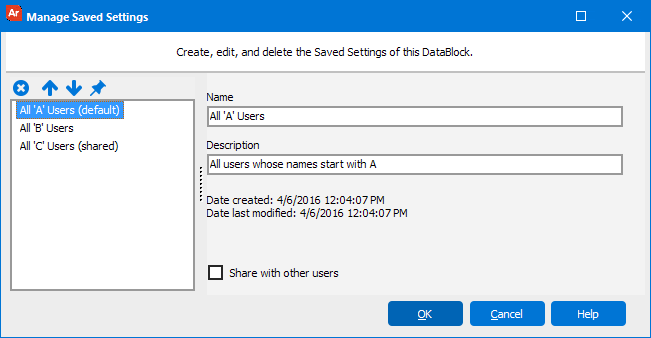
Select Save Current Settings to launch the dialog box below, where you can specify a name for this set of parameters. You can also enter a longer description for the setting, which will appear when editing in the future.
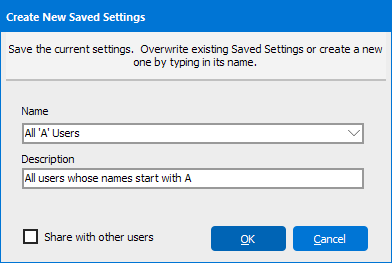
If you choose to share a saved setting via the Share with other users box, anyone who runs this dashboard will be able to load your saved setting. This is helpful when other users need to perform the same task in a specific dashboard.
Select Manage Settings to edit, delete, or reorder the saved settings that you created. You can also use the pin icon to assign a saved setting as the default, which will load this setting when the dashboard opens.
To load a previously saved setting that you or another user created, select it in the list.
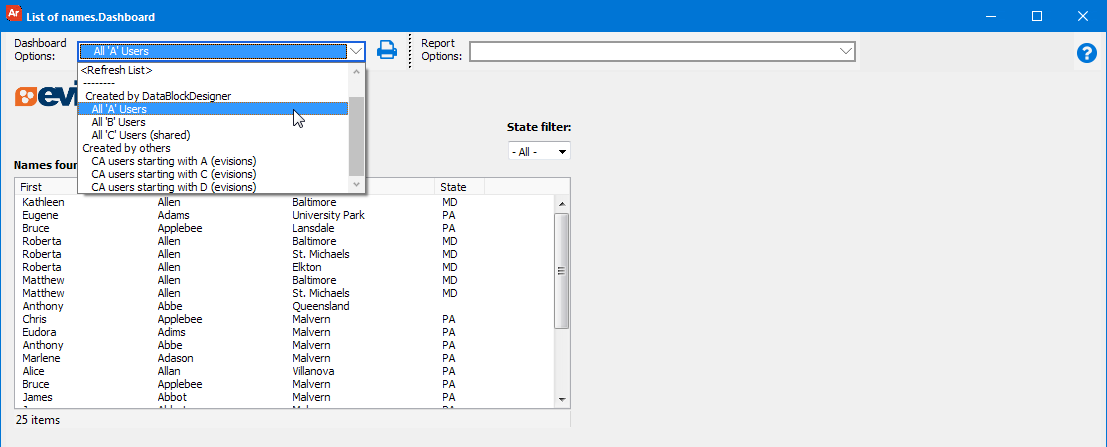
The dashboard will update to reflect the saved setting.
The <Refresh List> menu option updates the list of saved dashboard settings to see if other users have shared any saved settings since you launched the dashboard.
If you have created a custom ordering in the Manage Saved Settings dialog, you will also see an option to <Clear Custom Display Order>. This option returns your saved settings to default order. Note that if you have a custom ordering in place, any new saved settings will be added to the bottom of the relevant section instead of appearing in alphabetical order.